Server Requirements
The best server requirements for an Click stocks Laravel-based project that uses MySQL as its database would depend on the specific needs of the click stock , such as the number of users, the size of the course content, and the number of concurrent connections to the database. However, a general guideline for server requirements for a Laravel-MySQL project would be:
1.Operating System: Operating System: A Linux distribution such as Ubuntu 20.0 OR 22.10 is recommended, as Laravel is built on PHP, which is a popular language on Linux servers. You can also use Cloud Linux, Centos.2.Web Server: Apache are the most common web servers used with Laravel.
3.PHP: The latest stable version of PHP 8.3 is recommended for optimal performance.
4.Database:MySQL 5.7 OR Maria db 10.4 is recommended.
5.Memory: A minimum of 4 GB of RAM is recommended, but more may be necessary depending on the size of the Click stock and the number of concurrent users.
6.CPU: A minimum of 2 cores is recommended, but more may be necessary depending on the number of concurrent users and the complexity of the click stock.
7.Disk Space:A minimum of 20 GB of disk space is recommended, but more may be necessary depending on the size of the course content and the number of courses offered by the click stock.
8.Network: A minimum of 100 Mbps is recommended, but more may be necessary depending on the number of concurrent users and the amount of data being transferred.
It's worth noting that these are general guidelines and the specific server requirements may vary depending on the specific needs of the click stock . It's important to monitor the click stock performance and adjust the server resources accordingly.
Requirements
Before installing make sure you have the proper server requirements. Use Apache server for better performance
PHP 8.3, MySql 5.7 OR Maria db 10.4
OpenSSL PHP Extension
PHP Fileinfo extension
PHP Zip Archive
Allow furl extension must be enabled
JSON PHP Extension
Ctype PHP Extension
XML PHP Extension
Tokenizer PHP Extension
Mbstring PHP Extension
PDO PHP Extension
Intl PHP Extension
BCMath PHP Extension
Ctype PHP Extension
File and folder permissions for Shared Hosting (Cpanel/Plesk)
File and folder permissions for VPS
/public 777
/storage 777
/public/images 777
/public/config.txt 777
.env 777
VPS
VPS stands for Virtual Private Server. It is a type of hosting service that allows individuals or organizations to have their own virtual server, which is a software-based version of a physical server.
A VPS provides a user with the ability to have their own dedicated resources such as CPU, RAM, and storage, but still share a physical server with other users. This allows for more flexibility, control and security than shared hosting, but at a lower cost than a dedicated server.
A VPS provides a user with the ability to have their own dedicated resources such as CPU, RAM, and storage, but still share a physical server with other users. This allows for more flexibility, control and security than shared hosting, but at a lower cost than a dedicated server.
VPS hosting is ideal for websites or applications that have outgrown shared hosting but don't require the resources of a dedicated server. It allows users to install custom software, configure server settings and access the server remotely.
PHP = 8.3
OpenSSL PHP Extension
PHP Fileinfo extension
PHP Zip Archive
File and folder permissions
/bootstrap        775
/public/	  775
/storage          775
Shared Hosting Install
Add database details:
Database Port = 3306
Database Name = your_database_name
Database User = your_database_user_name
Database Password = your_database_password
Once you've added your database details to project, Project will automatically use these credentials to connect to your database when you run database-related commands or interact with your database in your code.
Add manually database detidetails is via .env file.
To add database details manually via the .env file in a Laravel application, follow these steps:
- Locate the .env File: The .env file is located in the root directory of your Laravel project. Use a text editor to open the file.
- Find the Database Configuration Section: Look for the section in the .env file that contains the database configuration variables. It typically starts with DB_.
- Set Database Connection Details: Update the values of the following variables to match your database configuration:
- DB_CONNECTION: Specifies the database connection driver. For MySQL, use mysql.
- DB_HOST:Specifies the database server hostname or IP address. (default is localhost or 127.0.0.1).
- DB_PORT: Specifies the port number on which the database server is running (default is 3306 for MySQL).
- DB_DATABASE: Specifies the name of the database you want to connect to.
- DB_USERNAME: Specifies the username for accessing the database.
- DB_PASSWORD: Specifies the password for the database user.
- Save the Changes: Save the .env file after updating the database configuration.
DB_HOST=localhost
DB_PORT=3306
DB_DATABASE=your_database_name
DB_USERNAME=your_database_user_name
DB_PASSWORD=your_database_passwordbr
Installation with Apache
Before installing, make sure mod_rewrite is enabled.
Unzip the source file
cd /home/user/
unzip quickquiz.zip
/home/user/quickquiz, you can configure Apache virtual host as follows (remember to point the DocumentRoot to the public folder of the source)
<VirtualHost *:80>
	ServerName yoursite.com
	DocumentRoot "/home/user/quickquiz/public"
	Options Indexes FollowSymLinks
	<Directory "/home/user/quickquiz/public">
		AllowOverride All
		Require all granted
	</Directory>
</VirtualHost>
Change the director/file’s owner to Apache’s running user (www-data for example), to make sure it has proper permission on your source files
sudo chown www-data:www-data -R /home/user/quickquiz
sudo chmod 775 -R /home/user/quickquiz
D. Mail Settings - top
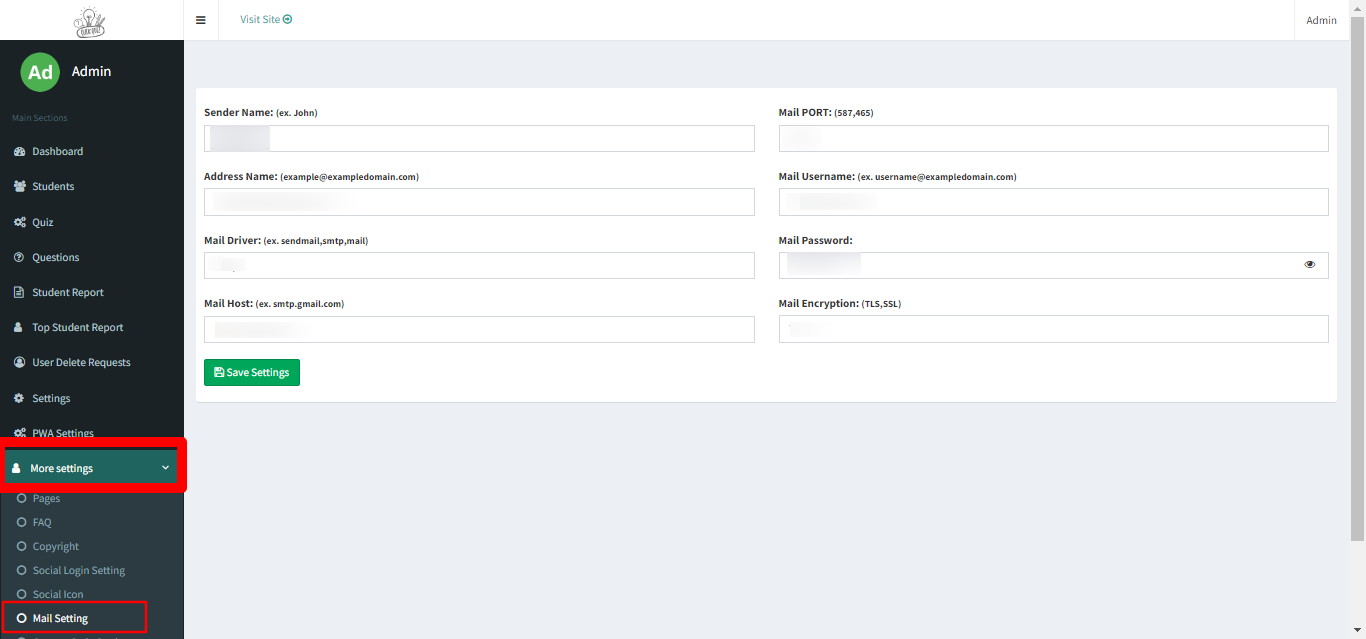
In this guide you will learn how to setup mail settings to send mail with click stock.Login To Admin -> Site Settings -> Mail Settings
For Email Sending.
An email driver is a software component that allows applications to send and receive email messages. It acts as an interface between the application and the email server, and allows the application to communicate with the server using a standard protocol such as SMTP (Simple Mail Transfer Protocol) or IMAP (Internet Message Access Protocol).
Email drivers are commonly used to send automated email notifications, send emails, confirmation emails or password reset emails to users.
SMTP (Simple Mail Transfer Protocol) is a protocol for sending email messages between servers. Most email systems that send mail over the Internet use SMTP to send messages from one server to another.
Sendmail: The Sendmail driver uses the sendmail command-line tool installed on your server to send emails. It works well on most Unix-based systems without requiring additional configuration
Open and edit .env file.
MAIL_DRIVER=smtp (smtp/sendmail/mail)
MAIL_HOST=smtp.mailtrap.io (For Gmail = smtp.gmail.com)
MAIL_PORT=2525  (For Gmail = 465)
MAIL_USERNAME=youremailid
MAIL_PASSWORD=yourpassword
MAIL_ENCRYPTION=null  (For Gmail = ssl)
For Mail Chimp Or Subscribe Newsletter Settings
For mail chimp or subscribe newsletter.
Open and edit .env file.
MAILCHIMP_API_KEY=yourapikey
MAILCHIMP_LIST_ID=yourlistid
Note : If showing error in reset password then must check your mail setting. Reset password error show due to you forgot add mail details in .env file.
Gmail SMTP Settings:
- SMTP username: Your Gmail address.
- SMTP password: Your Gmail password. If Using Gmail then Use App Password. Process of App Password
- SMTP server address: smtp.gmail.com.
- Gmail SMTP port (TLS): 587.
- SMTP port (SSL): 465.
- SMTP TLS/SSL required: yes.
2. Once you enabled the 2 step verification on your account under security tab visit App password section as shown below.

3. Click on App passwords to create new app and it will ask you for sign in again, Sign in again to continue.Once you signed in you will see a new app
.avif)
4. Click on select app option and choose Other (custom name) option. Enter the App name example : click on generate button.
.avif)
5. Once done ! you will successfully see a popup with password copy that password and back to click stock admin panel and visit Site Settings -> Settings -> Mail settings.
6. Put following settings in your mail settings
7. To test the mail is working on not use forget password feature and if mail not received kindly check spam folder too.
Blank white screen due to you give space in app name and mail from the name. Go to .env file and remove space and special characters in the app name and mail from the name.
Locate the .env File: The.env file is located in the root directory of your Laravel
project. Use a text editor to open the file.
MAIL_HOST=mail.yourdoamin.com (For Gmail = smtp.gmail.com)
MAIL_PORT=2525 (For Gmail = 465)
MAIL_USERNAME=your_emailid
MAIL_PASSWORD=your_password
MAIL_ENCRYPTION=null (For Gmail = ssl)
Updates
17/03/2026 ( Version 2.6 )
	- PHP 8.3
	- Security Improved
	- Responsive Improved
23/05/2024 ( Version 2.5 )
- PWA Settings
- User Account Delete Request
- XSS Attack improved
- Updated to Laravel 10
- Supports PHP = 8.3
14/03/2022 ( Version 2.4 )
- Update favicon issue resolve
- Home page UI issue fixed
- Updated to laravel 8.
- Minor Bug issue fix.
- Supports php 7.4
25/02/2021 ( Version 2.3 )
- Welcome E-Mail On/ Off through Admin Panel
- Debug Mode ON/OFF Through Admin
- Datatables implement
- 404/505 Pages
- Update Laravel Security Patch
- Comming soon On/ Off through Admin Panel
- You can now add up to 6 options in questions
- Add pages show in menu or not
- Added image section in user profile
- Added audio URL section in questions
- Custom CSS and JS issue fixed
- Change Password issue fixed
- Minor Bug issue fix.
05/09/2019 ( Version 2.2 )
- Results Issue Fixed
- Each Student Reset Answer
- Answer Explanation Issue Fixed
20/08/2019 ( Version 2.1 )
- Login & Register UI Issue
- Fix Footer Bar Issue
- Fix Question Not Adding Bug
- Show Answers Repeat Issue Fixed
- Change Password Issue Bug Fixed
- Add New User Through Admin Bug Fixed
28/05/2019 ( Version 2.0 )
- Social Icons Add
- Forgot Password Add
- Custom Pages
- Faq's
- Copyright Text Change
- Mail Setting Through Admin
- Payment History
- PayPal Payment Gateway Add
- Free And Paid Quiz Option
- Right Click & Inspect Element Disable
- Enable / Disable Show Answers
- Improve Change Password
- Delete Answer Each Quiz
- Git Lab Login (Twitter, Git Hub, Bit Bucket & Google)
- Social Login (Facebook & Google)
18 January 2019
- Hours Time Issue Resolved
- Question Again Given Issue Resolved
- Validate W3C
- Fixing Minor Bugs
10 June 2018
- Student Reports Show Issue resolved.
- Student Marks Issue Resolve
- Arrange Menu Proper Way
- Provide Proper descriptions and Instructions
- Footer Copyright, Title Issue Resolved
- Fixing Minor Bugs
05 January 2018
- Bulk Question Importer
- Student Marks Issue Resolve
22 December 2017
- Images Option In Questions
- YouTube & Vemo Video Option In Questions
- Students See Result After Quiz
Support
Need Support?
We’ll be happy to talk to you, don’t hesitate to mail us if there is any problem with our products or you just want to chat. You may reach us at
Support requests are being processed on business days Monday to Friday 10:30 to 18:00 (GMT +5:30) up to 2 business days.
Item support Policy:
Item support includes:
However,item support does not include:
Note:
Saturday and Sunday are non-working days we will not be able to provide support.Support Timings
Note: Saturday and Sunday are non-working days we will not be able to provide support.How to take quick support:
Bugs:
If you found any bug please mail us bug with screenshots, videos, we try to resolve as soon as possible. if your support expired and get bug no worry just report us. If you get any issue and its not in our live demo then its not count as bug. If Bugs are resolved in newer versions then upgrade to new version. Installation and updating not included in support.
Non-Critical Bugs: Bugs that are not critical but affect the usability or features of the software may require a fee to fix if support expired. We offer a bug-fixing service at a reasonable rate for such issues. You can choose to renew support package at current rates to receive continued bug fixes.
Critical Bugs: If a bug is deemed critical we will address it at no extra charge after support expired.
- sudhirchechani@gmail.com
Email: sudhirchechani@gmail.com
Disclaimer
Please be advised that it is the client's responsibility to conduct comprehensive testing of the project in both technical and non-technical aspects before making it live. We emphasize the importance of ensuring that all functionalities, integrations, and performance metrics meet your requirements and standards prior to deployment. We shall not be held responsible for any issues, errors, or discrepancies that arise after the project has gone live, including those that impact performance, functionality, or overall system operation.
Please note that we are not responsible for any kind of data loss or server crashes that may occur during the installation, updating, bug fixing, use, or maintenance of our software. We strongly recommend that all users take comprehensive backups of their data and server settings before sharing cPanel/Plesk Panel/FTP/SFTP/Cyber Panel/AA Panel/PhpMyAdmin, Server details or making any changes to their server configuration. By providing Server details or any other sensitive access credentials, you acknowledge and agree that you do so at your own risk, and it is your responsibility to ensure that your data is backed up and secure. We advise taking all necessary precautions to safeguard your data to avoid any potential data loss or service interruptions.
The user is solely responsible for ensuring their server environment is secure and properly configured. This includes applying necessary updates, monitoring for vulnerabilities, and using recommended security practices.
Any third-party services, including hosting providers, are the responsibility of the user, and we are not liable for their performance, billing, or associated issues.
We are not liable for any losses, including but not limited to:
- Bandwidth overages or additional charges.
- Data loss or corruption.
- Server provider billing disputes.
- Issues arising from phishing or other malicious activities.
- Downtime.
- Security breaches.
- Conflicts with third-party plugins, themes, or scripts.
The product provided is sold “as-is” without any warranties, express or implied. While we strive to deliver high-quality and reliable software, we do not guarantee that the software will be free of errors, bugs, or vulnerabilities. By using this software, you acknowledge and agree that you are solely responsible for how you implement, configure, and use it. We are not liable for any damages, losses, or issues resulting from the use or misuse of the software.
We do not warrant that the software will meet your specific requirements or that it will be compatible with all environments or platforms.
Prohibited Uses
You agree not to use this software for any unlawful, illegal, or unauthorized purpose, including but not limited to:
- Hacking, phishing, or spreading malware.
- Infringing on copyrights, trademarks, or other intellectual property.
- Violating privacy laws or data protection regulations.
- Hosting or distributing offensive, defamatory, or harmful content.
Disclaimer: GDPR Compliance
This software product is provided as-is and may include features designed to assist with data management and compliance efforts. However, we do not guarantee that all features or functionalities of this product meet the requirements of the General Data Protection Regulation (GDPR) or other data protection laws.
By purchasing, downloading, or using this software, you acknowledge and agree to the following:
- No Guarantee of Full GDPR Compliance: While this product may include tools or options related to GDPR compliance, it is not certified as fully compliant with GDPR or any other data protection regulations.
- Client Responsibility: It is the responsibility of the client (you) to evaluate, configure, and use the software in a manner that aligns with your specific legal obligations.
- Third-Party Verification: We recommend conducting an independent review and testing of the software to confirm its suitability for your GDPR or data protection compliance needs.
- Consult Legal Professionals: We strongly advise consulting with legal or data protection experts to understand your obligations and ensure proper compliance with GDPR or any other applicable laws.
The developer/seller of this product is not liable for any direct or indirect issues, claims, fines, or legal consequences arising from the use, misuse, or non-compliance of this software with GDPR or similar regulations.
By proceeding to purchase or use this product, you agree that it is your sole responsibility to address and ensure compliance with relevant data protection laws, and you release the developer/seller from any associated liability.
Regular & Extended Licenses
If the end users need to pay to see the end product, you need an Extended License. There can be more than one end user as long as there is only one end product. You need an Extended License if the end product is sold to end users. If the end product is free, even if you are a commercial enterprise, you only need a Regular License. If the item is used in a part that requires payment to access or make use of, you need the Extended License.
Please Read :https://codecanyon.net/licenses/standard
Privacy Policy
https://mediacity.co.in/privacy-policy/
Demo Limitations
Some features are disabled or limited in the demo for security and performance reasons.
This is expected and only applies to the demo.
Update Process
Note: Before Update Take Backup of All Files And Database. Make .zip file and download all file, Go To phpmyadmin and select your database and export it.
Copy All files and paste to you folder replace file. Only be careful when replace files in public folder and .env file. Any user customize design and code please do not update. For database do not import all tables. Please Do not import whole database file, only new user required to update whole database.
Update Version 2.0
Copy All files of folder and paste to you folder replace file, only be careful when replace files in public folder. Database old is work fine but need some columns and tables.
| 1. | Add show_ans, amount column in topics table. Make both Integer and NULL. |
| 2. | Add right_setting, element_setting, fb_login, gitlab_login, google_login column in settings table. Make all boolean and NULL. |
| 3. | Add google_id, facebook_id column in users table. Make both column unique and NULL. |
| 4. | Remove tests table. It's not required. |
| 5. | Create New Table topic_user, faq, copyrighttexts, configs, social_icons and pages. Note: You Can Import Table From Database -> Old Users Update -> quickquiz_2_0.sql. |
Note: You Can not Import Columns, You need to create it Manually.
Update Version 2.1
First Update 2.0 then update it. Copy All files of folder and paste to you folder replace file, only be careful when replace files in public folder and .env file. Any user customize design and code please do not update.
Note: Before Update Take Backup of All Files And Database. Make .zip file and download all file, Go To phpmyadmin and select your database and export it.Update Version 2.2
First Update 2.0 then update it. Copy All files of folder and paste to you folder replace file, only be careful when replace files in public folder and .env file. Any user customize design and code please do not update.
Note: Before Update Take Backup of All Files And Database. Make .zip file and download all file, Go To phpmyadmin and select your database and export it.Update Version 2.3
Note: Before Update Take Backup of All Files And Database. Make .zip file and download all file, Go To phpmyadmin and select your database and export it.
First Update 2.2 then update it. Copy All files and paste to you folder replace file. Only be careful when replace files in public folder and .env file. Any user customize design and code please do not update. For database do not import all tables. Please Do not import whole database file, only new user required to update whole database.
| 1. | Add show_in_menu column in pages table. Make column integer(11) and Default 0. |
| 2. | Add e, f column in questions table. Make both column varchar(255) and NULL. |
| 3. | Add question_audio column in questions table. Make longtext and NULL. |
| 4. | Add wel_mail, coming_soon column in Settings table. Make both column tinyint and default 0. |
| 5. | Add comingsoon_enabled_ip column in Settings table. Make column varchar (255) and NULL. |
| 6. | Add image column in pages table. Make column longtext and NULL. |
Note: You Can not Import Columns, You need to create it Manually.
Update Version 2.6
Note: Before Update Take Backup of All Files And Database. Make .zip file and download all file, Go To phpmyadmin and select your database and export it.
First Update 2.4 then update it. Copy All files and paste to you folder replace file. Only be careful when replace files in public folder and .env file. Any user customize design and code please do not update. For database do not import all tables. Please Do not import whole database file, only new user required to update whole database.
Update Version 2.4
Note: Before Update Take Backup of All Files And Database. Make .zip file and download all file, Go To phpmyadmin and select your database and export it.
First Update 2.3 then update it. Copy All files and paste to you folder replace file. Only be careful when replace files in public folder and .env file. Any user customize design and code please do not update. For database do not import all tables. Please Do not import whole database file, only new user required to update whole database.
Update Version 2.5
Note: Before Update Take Backup of All Files And Database. Make .zip file and download all file, Go To phpmyadmin and select your database and export it.
First Update 2.4 then update it. Copy All files and paste to you folder replace file. Only be careful when replace files in public folder and .env file. Any user customize design and code please do not update. For database do not import all tables. Please Do not import whole database file, only new user required to update whole database.
Note: You Can Import Table From Database -> Old Users Update -> quickquiz_2_5.sql.
| 1. | Add Delete_request column in user table. Make column varchar(256). |
| 2. | Add Delete_reason column in user table. Make column varchar(256). |
Note: You Can not Import Columns, You need to create it Manually.
Source &Credits
Thanks for each of these people that made our Plugin look amazing with their fabulous Images, Icons, Fonts, Js, Css and Videos.
HTML / CSS:
Note: Images only for demo version. Images used in previews are not included in download file.
Conclusion
Once again, thank you so much for purchasing this Plugin. As I said at the beginning, I'd be glad to help you if you have any questions relating to this Plugin. No guarantees, but I'll do my best to assist. If you have a more general question relating to the Plugin on ThemeForest, you might consider visiting the forums and asking your question in the "Item Discussion" section.